 skfbalbums - Show Facebook Image Albums on your TYPO3 Site
Usage
- Installation
- Creating a Token Page Record to connect to Facebook
- Synchronize Albums using the TYPO3 Scheduler
- Synchronize Albums on demand using the TYPO3 Module
- Using the Plugin
- Overriding title and description of albums and photos
Installation
Install the extension.
Before version 0.0.17, if you wanted to use the backend module to sync albums on demand, you had tp add the static template into your sites main template. This is no longer necessary
Creating a Token Record to connect to Facebook
You will need a Facebook page access token with permission to retrieve photo data of the Facebook page you are interested in. Detailed instructions on how to get those are available on page Facebook token.
In TYPO3, the first step is to create a “Facebook Page Token”. This will store the information of your Facebook App in order to connect to Facebook and retrieve information about Albums and Photos. You also specify the Facebook Page it should connect to.
Moreover, you can exclude some Albums from retrieval, or include only specific Albums. Both are done using the Facebook Album ID. You can get the Album ID of specific Albums from the URL of the Album. Please google it.
Go to the TYPO3 List Module, and create a new “Facebook Page Token” in a folder or a page. Fill in the the following information:
- A Name, for your own usage. E.g. “FB Token for Page xyz”
- Access token: the page access token with permissions to the page you are interested in
- Facebook Page Id: the page id of the Facebook page you want to connect to.
- From version 0.0.17, you can download the images to your local server and serve them from there. This is enabled on a per Album basis. With the checkbox "Albums set to download and serve images from local server" you can specify whether new albums should be handled this way or not.
- Optionally, Exclude Album Ids: a comma separated list of Facebook Album Ids (not TYPO3 Ids!) that should be excluded. If set, these albums will be excluded.
- Optionally, Include Album Ids: a comma separated list of Facebook Album Ids (not TYPO3 Ids!) that should be included. If set, only these specified albums will be included
The retrieved album and photo data will be stored in the same folder as your token. You can create multiple Tokens if you need to retrieve albums and photos from different Facebook Pages. You can also create Tokens for the same Facebook page in different TYPO3 pages/folders.

Retrieve Information about Albums and Photos from Facebook and check connection
Having created a token record, you can retrieve information about albums and photos the token points to. You can use a scheduler task for it, and periodically synchronize the information, or you can syncrhonize on demand using the web module.
The extension can download the images locally to your server, or use direct links to Facebook CDN. Direct links to Facebook tend to change, you must periodically refresh the data. The best way to do it is by using the scheduler task.
Synchronize Albums using the TYPO3 Scheduler
The TYPO3 Scheduler can periodically retrieve photo data from all or some of your tokens.
Go to the Scheduler TYPO3 Module, and create a task of class “Sync Facebook Page Albums”. Choose the Frequency wisely: you do not want to run this tasks too frequently. Once per day should be enough.
There is a special field for this Scheduler Task labeled “TYPO3 Page Ids to include. Comma separated. Leave blank for all.”. If you leave this field blank, the task will retrieve the album and photo data for all tokens stored in TYPO3 pages/folders. You can limit the tokens by specifying the page id(s) you want to be included. Then it will retrieve data only for tokens stored in the specified page(s). Multiple pages are separated by comma.
You can have multiple scheduler tasks with different frequency that retrieve data from tokens on different pages.
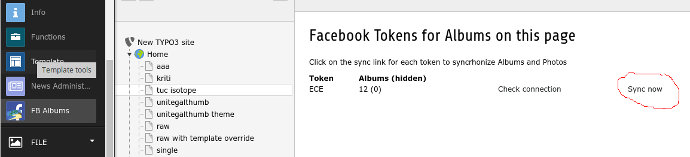
Synchronize Albums on demand using the backend module
If you want to use the backend module to sync albums on demand, add the static template into your sites main template.
Instead of using the scheduler, you can retrieve and synchronize data on demand by using the TYPO3 Backend Module of the extension.
Click on the module, and then select a page or folder that holds tokens. The list of tokens will be displayed, and a “sync” link for each of them to initiate the synchronization.
If the files are not set to be downloaded locally to your server, each synchronization should not take longer than a few seconds. If it takes too long (e.g. because there are many photos), you can get a timeout from your web server. In this case you must either increase the PHP timeout of your server, or use the scheduler to make the synchronization.
If some or all of your albums are set to download files locally, the sync process may take several minutes.
Check connection
The Backend Module can also be used to check the connection info for your tokens (the provided user access token and page id). Beside the link for synchronizing the information for photos and albums, there is also a “Check connection” link for each token.
Clicking this link, makes a simple connection to Facebook to figure out if the provided data is correct. If not, the response headers from Facebook are displayed, which usually have more information on why the call has failed.
Using the Plugin
After creating a token and synchronizing the Facebook Albums and Photos, you are ready to show them on your page. The extension provides a Plugin for this purpose.
The plugin has 2 operation modes
- Showing a list of albums, and after clicking on an album, showing the list of photos of the album. A link back to the album list is shown.
- Showing a single album. Only the photos of this single album are shown
For both the album list and the single album view, you can choose the layout that should be used.
The most important setting of the plugin is the setting of the Record Storage Page. For the album list, you must choose the page or folder where your album and photo data is stored. Album and photo data are stored in the same folder as the token you have created.
Setting the Record Storage Page is not needed if a single album is selected.
Important: If you select Unite Gallery as the single album layout, your page must include jquery for it to work. The extension does not ship jquery, so you must include it in your template. You can include it for example with the code below in the Setup field of your template
page.includeJS {
    jquery = //ajax.googleapis.com/ajax/libs/jquery/1.11.1/jquery.min.js
    jquery {
        forceOnTop = 1
        disableCompression = 1
        excludeFromConcatenation = 1
        external = 1
    }
}
The plugin displays only those input fields that are applicable to the selected display mode (list, single) and layout. See below for a description of all the available options:
- Record Storage Page: You must set the record storage page for the album list to work. This is the page or folder that stores your album and photo data.
- What to display: Choose between Album List and Single Album Photos. As the name suggests, Album List displays a list of albums, and Single Album Photos only the photos of a single album.
- Album for single view: Shown only if Single Album Photos is selected. You must choose here the photo album that should be displayed.
- Album list layout: Shown only if Album list is selectet in What to display. It controls the layout to use in order to show the list of albums. You can choose between Plain, CSS Masonry and Raw. Plain and Raw should not be used. They are just for demonstration or in order to override them.
- Do not show the album title: self descriptive
- Do not show the album description: self descriptive
- Single album layout: The layout to use in order to show a single album. You can choose between Plain, Css Masonry with Lightbox, Unite Gallery and Raw. Plain and Raw should not be used. They are just for demonstration or in order to override them. As mentioned above, Unite Gallery needs jquery in your page to work
- Do not show photo caption: self descriptive
- Do not show album title: self descriptive
- Do not show album description: self descriptive
- Do not use album title in HTML head title: self descriptive
- Unite Gallery Options, Shown only if Unite Gallery is selected as layout for the single albums
- Unite Gallery Theme: You can choose the Unite Gallery theme to use. Have a look at http://unitegallery.net/ for various demos.
- Autoplay: If the theme supports it, automatically switches slides
- Play interval of the slideshow: If the theme supports it, the delay between switching slides
- Gallery height (e.g. 500): If the theme supports it, the height (in pixels) of the gallery. Just the number
- Gallery Width (e.g. 900 or 100%): If the theme supports it, the width (in pixels or percentage) of the gallery. Just the number if it is pixel value, or with the percent sign
- Gallery minimal width when resizing: The minimum width of the gallery in pixels. Just the number
- Tile width: If the theme supports it, the width of the tiles
- Tile height: If the theme supports it, the height of the tiles
- Unite Gallery additional params. One per line of the form name:value without quotes: Unite Gallery has tons of options available. And they differ in each theme. You can use this text box to add additional options. For example, if you want to change the slider transition speed, you would add here a line slider_transition_speed:300
Overriding title and description of albums and photos
Facebook albums have a title and a description. Photos have just a caption. These are retrieved and used on the pages. You can override them for each album and each photo by editing the respective record in the backend. Use the fields Caption Override for a photo, and Name Override and Description Override for an album.